Home / Articles / Tagged: crafts

Pool Noodle Hockey for Kids

During the Summer Olympics there are mens and womens field hockey teams. They play with a stick that has a shepherd's crook on it and hit a small ball.  

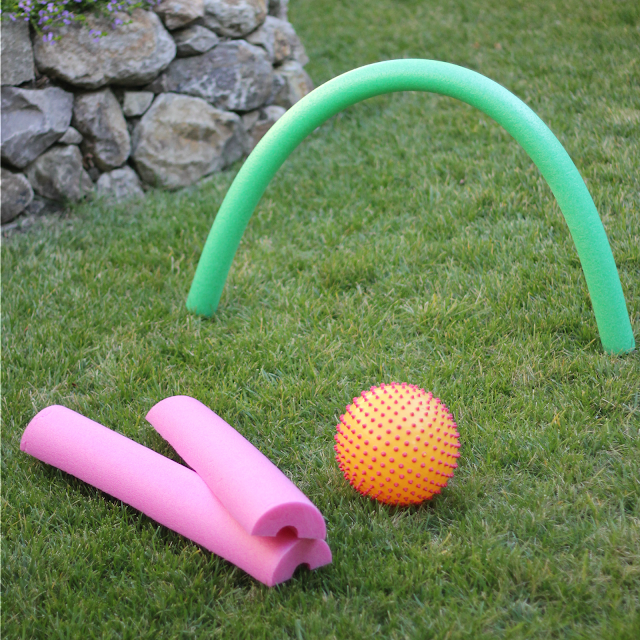
For our pool noodle hockey game I created goals and sticks using pool noodles. Scroll down for more details.

MATERIALS NEEDED FOR POOL NOODLE HOCKEY:

  • fat pool noodle
  • knife
  • two thin long pool noodles
  • large ball
  • 4 lawn stakes

HOW TO SET UP FOR POOL NOODLE HOCKEY:

Set up is super easy! Start by putting two yard stakes in the ground about 2ft away from one another. Put them in the ground deep enough to stay but leave them high enough out of the ground that several inches are visible.
Arch one pool noodle from one yard stake to the other and slip the yard stakes into the centers of the pool noodle ends. The pool noodle should make an arch and stay pretty secure, unless it is super windy. Repeat with another pool noodle maybe 10-15 ft away (depending on how large of a field you want).
Next, cut the fat pool noodle in half lengthwise. The cut side of the pool noodle is a bit easier to hold on to and it is easier to hit balls with the fat pool noodle pieces. 
Now you are ready to play!

HOW TO PLAY POOL NOODLE HOCKEY:

We made small teams of one and worked hard to get the ball in the other goal before it was stolen! Using the pool noodle half we hit the large ball again and again. My son was so proud of himself once he figured out how to "dribble" the ball up the field using his pool noodle. 

It is fun to get the entire body into pool noodle hockey, which was why we set some ground rules to begin with. We encouraged kids to keep their sticks on the ground or close to it when they were hitting the ball (no high sticking) and to keep their bodies to themselves (no fouls)!

This activity is great for working on hand-eye coordination, aiming, swinging, and working together.

source: toddlerapproved

Outdoor kids’ carnival with cardboard boxes

You don’t have to wait for the carnival to come to town to have some carnival-themed fun! Check out these DIY ideas to build a carnival in your own backyard!

Clown bean bag toss

What you’ll need:

  • large piece of cardboard
  • small piece of cardboard
  • colored poster board
  • white poster board
  • scissors
  • Exacto knife
  • glue
  • tape
  • construction paper
  • markers
  • bean bags

What you’ll do:

  1. Cut the cardboard so that it is the same size as the piece of colored poster board. Glue the colored poster board to the cardboard.
  2. Cut out three circles from the white poster board. Glue them to the blue poster board to make the clown’s heads.
  3. Cut out three triangles from the construction paper. Glue the triangles to the top of the clown’s heads. Use markers to decorate the hats.
  4. Draw the shape of a mouth on each clown’s face. Use the Exacto knife to cut the opening through the poster board and the cardboard backing. Only parents should handle the Exacto knife.
  5. Use markers to draw eyes and a nose on each of the clowns.
  6. Cut the small piece of cardboard in half diagonally to form two triangles. Tape the triangles to the back of the large piece of cardboard to make “legs” to help it stand up.

Cardboard carnival ticket booth

What you’ll need:

  • large cardboard box
  • flat piece of cardboard
  • wrapping paper tube
  • solid color gift wrap
  • crepe paper
  • construction paper
  • string
  • scissors
  • tape
  • glue

What you’ll do:

  1. Wrap the large cardboard box with the solid color gift wrap.
  2. Make the sign by cutting the flat piece of cardboard to the same width as the box, and about one foot tall.
  3. Cut several sheets of yellow and white construction paper in half lengthwise. Round the corners on one end of each strip. Glue the strips to the cardboard to create the sign for the ticket booth.
  4. Draw the letters for the word “tickets” on black construction paper. Cut out the letters and glue them to the sign.
  5. Cut the wrapping paper tube in half and glue both halves to the back of the sign to support it.
  6. Use tape to secure the bottom of the wrapping paper tubes to the top of the large cardboard box.
  7. Wrap the wrapping paper tube with crepe paper and use tape to keep it in place.
  8. Create a bunting by cutting triangles out of colored construction paper. Tape the triangles to a piece of string, then swag the bunting across the ticket booth.

Balloon dart board

What you’ll need:

  • large piece of cardboard
  • solid color gift wrap
  • 20 to 25 balloons
  • tape

What you’ll do:

  1. Wrap the large piece of cardboard with the gift wrap.
  2. Inflate 20 to 25 balloons (no helium required) and tape them to the board.
  3. Throw darts at the balloons to pop them.

Photo booth backdrop

What you’ll need:

  • large piece of cardboard
  • plain wrapping paper
  • plastic table cloth
  • assorted construction paper
  • string
  • scissors
  • tape

What you’ll do:

  1. Cover the large piece of cardboard with the plain wrapping paper.
  2. Unfold a large plastic table cloth and cut it in half. Tape a short end of each piece to the top of the cardboard to make curtains.
  3. Cut a narrow strip off of the bottom of each piece of tablecloth. Use the narrow strip of tablecloth to tie back the curtains. Tape the ties to the back of the cardboard.
  4. Cut triangles out of construction paper. Tape the triangles to a piece of string to make a bunting, and tape the bunting across the top of the backdrop.
  5. Have kids pose for pictures in front of the backdrop.


source: sheknows

Sensory Play Bubble Wrap

Need a quick and fun activity to do with your toddler? This sensory play bubble wrap activity is full of fun and super simple, too!

Bubble wrap is so much fun and there are so many things you can do with it!

Sensory play is also so good for young children. This is a quick and cheap sensory activity! It’s also COMPLETELY EDIBLE (well, the yogurt paint is), so it’s safe for babies and toddlers who put EVERYTHING in their mouths (like mine do).

Your baby could do this activity on their tummy. Most babies can start eating yogurt around 7-8 months. This would be a great activity even if they are on their tummy. Just watch them closely with the bubble wrap and tape to make sure none of those go in their mouth.

So if you have a bunch of bubble wrap from a recent package, then you should try this super fun activity! I’m sure your toddler will have a blast – at least mine did! They love messy stuff.

What you will need for the Sensory Play Bubble Wrap:

  • Cookie Sheet (or you could tape it to a table)
  • Painter’s Tape (for taping down the bubble wrap so it doesn’t move)
  • Yogurt (any will do but I like plain so I can easily add food coloring to it)
  • Food Coloring (optional but my twins like all the different colors. Plain yogurt works just fine and might be good if your child eats a lot of it)
  • Muffin pan (for the yogurt paint)
  • Paint brushes or other items to paint with

Setting up this Activity:

  • Put a scoop or two of plain or vanilla yogurt into the muffin pan. I just did 5 spots in the muffin pan because we did 5 colors.
  • Add in a drop or two of food coloring.
  • Stir up well (your toddler could help you)
  • Tape bubble wrap to a cookie sheet using Painter’s Tape
  • Give them paint brushes or other utensils to use (or just their hands work great)

They really did keep the yogurt on the cookie sheet because they were so fascinated with the bubble wrap. So there wasn’t too much clean up!