Home / Articles / Tagged: crafts

Potato Stamping the Easy Way

Potato Stamping the Easy Way

This simple method for creating potato stamp art will have your kids busy for hours. So today, we’re showing you potato stamping – the easy way!

Here’s what you’ll need to make your potato stamps:

  • A large potato
  • Cookie cutters – preferably ones like these that we used which have an imprint in them and will create more of a design when you stamp them
  • Paint

How to Make a Potato Stamp


1. First cut your potato in half. Then press your cookie cutter into the potato as far as you can. Make sure the imprint portion of the cutter goes into the potato. If it doesn’t, flip the potato over and push down hard over top the potato.

2. Now carefully cut around the edge of the cookie cutter (adults only) to leave a portion of potato sticking out where the cookie cutter was.

3. Peel away this excess portion of the potato.

4. Now your potato stamps are ready. Look how pretty they look!

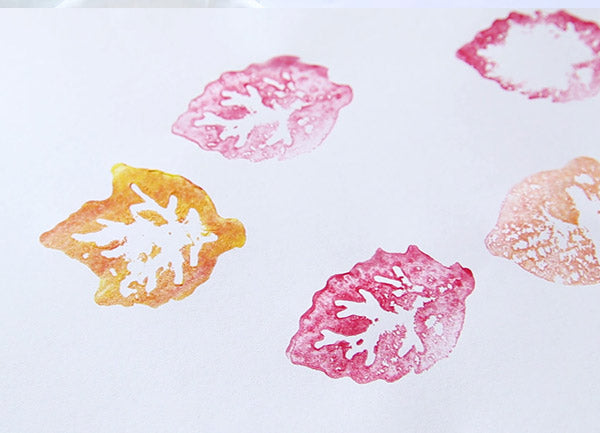
Here is a leaf potato stamp:

5. Add a little bit of paint to your stamp. Don’t add too much or the features won’t show up.

Now have fun potato stamping away! You can make stamped cards, wrapping paper, or just plain print art.

STEM for Kids: Straw Rockets

STEM for Kids: Straw Rockets

The kids loved designing their own rockets and then launching them using straws- such a great way for kids to explore science!

Here’s an easy way to make straw rockets using just a few materials. This project makes a great addition to a unit on physics, space, the night sky, or things that fly and is also just fun to do on a rainy day!

This activity makes a great science exploration and is perfect for the classroom. Kids can compare how different angles of the straw affect the distance the rocket travels or how adding fins or folding the rocket in different ways can affect its flight.

Materials for Making Straw Rockets

  • Straws
  • Tape or glue dots
  • Plastic pipettes (or straws with a larger diameter than the other set of straws)
  • Markers, crayons, or colored pencils
  • Scissors
  • Free Rocket Template from the internet

Directions for Making Straw Rockets

1. Print out the free rocket template. Color the rockets and cut them out.

2. Cut the bottom off a plastic pipette and attach it to the back of a rocket using tape or glue dots. (We love having a stash of plastic pipettes at home. They’re so fun to use with painting and often come in handy for various science activities- like with our color arrays. And they’re super inexpensive!)

If you don’t have any plastic pipettes handy, you can use a straw instead. (Just make sure this straw is wider than the other straw you’ll be using for launching.) Cut the straw to fit the length of the rocket and tape one end shut so it’s completely sealed. Attach it to your rocket with glue dots or tape.

3. Slip a straw into your pipette, and you’re ready to launch!

4. Give your straw a big puff of air, and watch it take off!

Extending the Straw Rockets Science Activity

  • How does the angle you launch your rocket affect the distance it travels? Try out different angles and record the results.
  • Can you design your own rockets to attach to the pipette or straw? Which designs work better?
  • Try adding another fin to your rocket with tape. How does it affect the flight of your rocket?


source:buggyandbuddy

MARSHMALLOW SHOOTERS

MARSHMALLOW SHOOTERS

This marshmallow shooter DIY is a childhood must do! It’s a simple kids activity that doubles as a science project and is so much fun you will end up playing with it even after the kids are asleep. True story. ;)

This version of the marshmallow shooter is made with a cake pop container so the next time you have one at a party make sure to save it–you can turn it into hours of fun for your kiddos!

How to Make Marshmallow Shooters

  • cake pop container
  • balloon
  • scissors
  • mini marshmallows
  • rubber bands (optional)
Take an un-inflated balloon and tie a knot in the end. Then cut the bottom half (rounded part) of the balloon off. Stick the open end of the balloon on the bottom end of the cake pop container and you are ready to play!

If you have energetic shooters (like I do!) you may want to use a rubber band to reinforce the balloon. It will help it stay on no matter how hard they pull.


Experiment with your kids to see how changing the amount of marshmallows or force used changes the outcome. It’s a great way to get kids thinking critically and having fun!